Contents
- 1Introduction
- 2Basic Concepts
- 3Your choices and my recommendations
- 3.1A - 3 video codecs
- 3.1.1 Option 1 – H264:
- 3.1.2Option 2 – H265:
- 3.1.3Option 3 – VP9:
- 3.2B - MKV vs MP4 vs WebM
- 3.3C – Handbrake and AviDemux
- 3.4D - Constant Quality vs Constant Bitrate vs Variable Bitrate
- 3.5E – Considerations for the future
- 4Encoding comparisons to help you choose
- 4.5.1HandBrake x264:
- 4.5.2Handbrake x265:
- 4.5.3FFMPEG VP9:
- 4.5.4Premiere H264:
- 4.5.5HandBrake x264:
- 4.5.6Handbrake x265:
- 4.5.7FFMPEG VP9:
- 4.5.8Handbrake x264:
- 4.5.9Handbrake x265:
- 4.5.10FFMPEG VP9:
- 4.5.11NOTES:
- 5Encoding the Video portion with Handbrake
- 5.5.1Picture Tab:
- 5.5.2Filters Tab:
- 5.5.3Video Tab:
- 5.5.4Advanced Tab:
- 5.5.5FFMPEG for VP9:
- 6Encoding the Audio portion with Handbrake
- 6.1A – Separating the myths from the facts
- 6.2B – Definitions, formats and my choices
- 6.3C – Examples of the Handbrake Audio Tab
- 7Streaming basics and a comparison – CPU vs NVENC vs Quick Sync
- 7.3.1Audio, push-to-talk and hotkeys Settings:
- 7.3.2Stream Settings:
- 7.3.3Video Settings:
- 7.3.4Output Settings:
- 8Streaming examples for CPU, NVENC & Quick Sync
- 8.3.1CPU (x264)
- 8.3.2Quick Sync (QSV)
- 8.3.3NVENC
- 9Recording examples for CPU, NVENC & Quick Sync and recording while streaming
- 9.3.1CPU (x264)
- 9.3.2Quick Sync (QSV)
- 9.3.3NVENC
- 10Buffer recording and AVIDemux
- 10.3.1Replay Buffer
- 10.3.2AVIDemux
Encoding the Video portion with Handbrake
Get your copy of Handbrake here:
https://handbrake.fr/downloads.php
My version is 1.0.1 at the time of writing. If the appearance changes significantly I’ll update screenshots but you should be able to figure it out.
So, open it up and pick your source file or disk. If you choose a disk or folder the top left “Title” dropdown will have multiple choices. You can “Add to Queue” for ALL titles if you have a default set for the way you want them all. Or you can individually select the titles and specify their settings then add to queue individually.
Picture Tab:
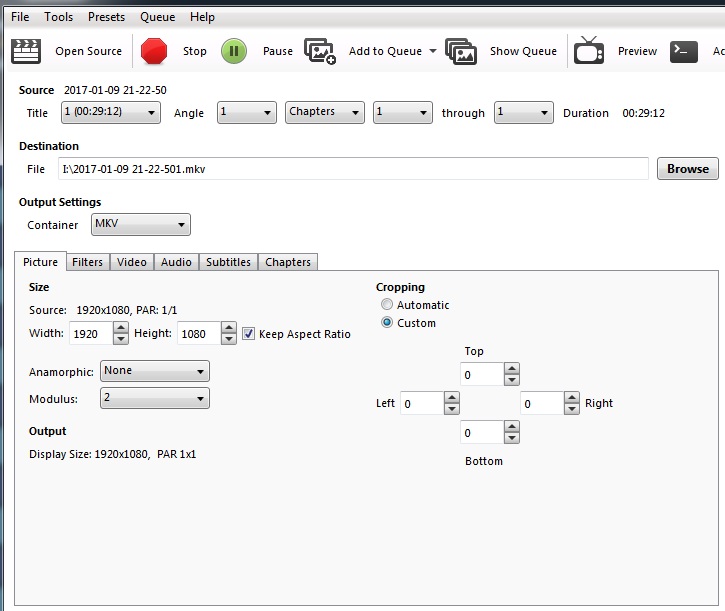
OK you want your source to show the resolution your original video is in. I recommend choosing Anamorphic = None and Modulus = 2, then go over to cropping and make it “Custom” and set all the numbers to 0. Sometimes if you’re encoding a source with a different aspect ratio, this tab will be the cause of squishing or stretching. So here is where you address that.
Anamorphic is a way for Handbrake to automatically get rid of the black bars around your video. It will set cropping values for you as multiples of the “Modulus”. When a video has black bars, it will take up more space on your HDD than it really needs to. Take the black bars away, the file is smaller, and when it plays on a screen of different aspect ratio your screen will add the black bars itself. Handbrake is pretty good at this but SOMETIMES it gets it wrong. Game recorded footage should have no black bars and I like to force “No Cropping” with these settings just to avoid the possibility of problems.
Filters Tab:
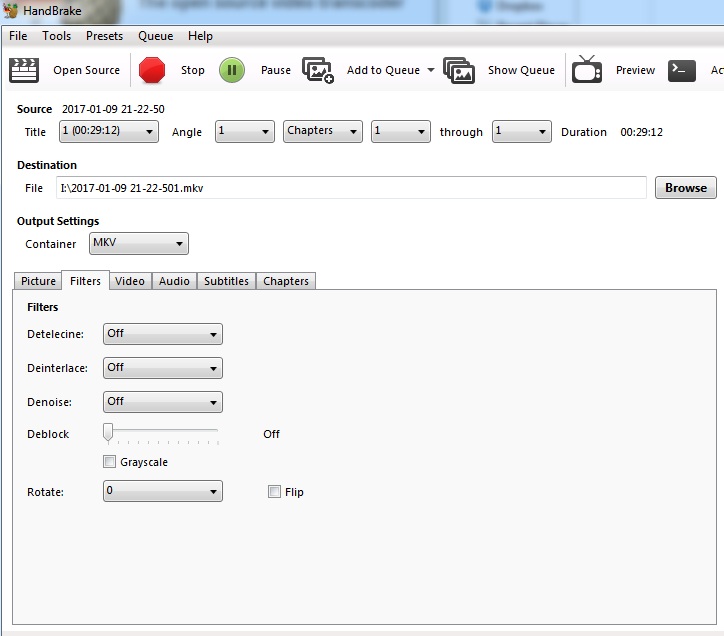
Turn them all off. Unless you know your video is interlaced, then you can set it to “Decomb” using “Default” Preset. Interlace Detection will come up if you do this, and you can make it automatically detect Interlaced videos, but I don’t.
Video Tab:

This is where the magic happens. Set your video codec and hope that you picked one based on some of the tests I provided above. Generally, you might need to experiment a bit to find what encode speed you’re comfortable with, I go for the longest I can bear. So, set the following:
Video Codec = x264 or x265. Don’t use the others, VP9 is so much faster in FFMPEG and even there it’s slow.
Framerate = Same as source, Variable. Because you don’t want to lose frames or make up new ones.
Use Advanced Tab Instead = Off to use the presets on the slider, On to make the Advanced Tab come up for customisable options (see below).
Encoder Preset = How fast you want it to happen. The slower it goes, the smaller the file size will be (exceptions happen, see above section 3-D for explanation)
Encoder Tune = None. This will tune the final result to perform better on particular tests. Don’t do it, we just want it to look good to us, not to a computer.
Fast Decode = Off. This lets the video play on devices with weak CPUs. But it limits the compression technologies. If your device can’t play it, get a new device or turn down the resolution on YouTube.
Encoder Profile & Level = High 5.1 for x264. Main for x265.
Extra Options = Empty, completely blank. If you’re reading a guide on how to do this, then this box is not for you just yet.
Quality = RF 20. You can fiddle with this if you think I’m too picky with my video quality. It’s not a big deal, you can always make a “small copy” and a “better copy” if you’re thinking upload times and such. Just whatever you do, use Constant Quality, not Avg Bitrate.
Audio Tab is covered in the next section.
Subtitles Tab is beyond the scope of this guide. Needless to say, if your original contains subtitle tracks, you can add them to your final file. MKV containers can hold any number of subtitle tracks within them. You can even take an external subtitle file like .srt and embed it as a track in the MKV file.
Chapters Tab again is beyond ye olde scope. But, if you like, you can insert chapter markers so that during playback, the chapter forward/back button will skip to that point. This might be good for long videos with several matches/segments.
Advanced Tab:
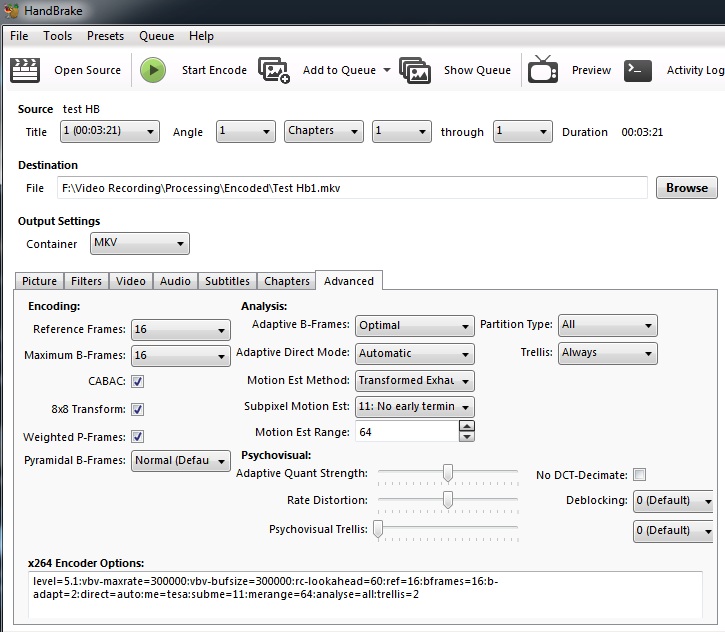
The settings in the screenshot are what I use on my “x264 Max” settings in the encoding comparison examples above. Feel free to adjust it as you see fit. You can hover over each field for a short description. Bear in mind that most of these settings need to be pretty high for it to be better than Very Slow or Placebo. The difference between this and Placebo is that the Motion Estimation Range is much higher in Max.
Each of the presets on the Video Tab correspond to a particular combination on the Advanced Tab. You can see what they are at this link: http://dev.beandog.org/x264_preset_reference.html
FFMPEG for VP9:
If you really want to go down this path, get it from here: https://ffmpeg.org/download.html
Go into your installation directory, then into the “bin” subdirectory. Make a text file and save it as something like “go.bat” but make sure to save as type “all files” so that it will register as a batch file. Then in there put this text:
ffmpeg -i input.mp4 -c:v libvpx-vp9 -pass 1 -b:v 0 -crf 20 -threads 8 -speed 4 -tile-columns 6 -frame-parallel 1 -an -f webm temp.webm

ffmpeg -i input.mp4 -c:v libvpx-vp9 -pass 2 -b:v 0 -crf 20 -threads 8 -speed 0 -tile-columns 6 -frame-parallel 1 -auto-alt-ref 1 -lag-in-frames 0 -c:a copy output.webm
This will take a file called “input.mp4” and encode it to a file called “output.webm” and it will passthrough the audio because of the “-c:a copy” switch.
You can activate a mode called AQ, which I won’t go into here. But it will improve quality and increase file size so it may or may not be useful to you:
ffmpeg -i input.mp4 -c:v libvpx-vp9 -pass 1 -b:v 0 -crf 20 -threads 8 -speed 4 -tile-columns 6 -frame-parallel 1 -g 9999 -aq-mode 1 -an -f webm temp.webm

ffmpeg -i input.mp4 -c:v libvpx-vp9 -pass 2 -b:v 0 -crf 20 -threads 8 -speed 0 -tile-columns 6 -frame-parallel 1 -auto-alt-ref 1 -lag-in-frames 0 -g 9999 -aq-mode 1 -c:a libvorbis output.webm
When you’re ready and saved the batch file, use the command line to run it, or just double-click it in Windows. It looks like this if it’s working:
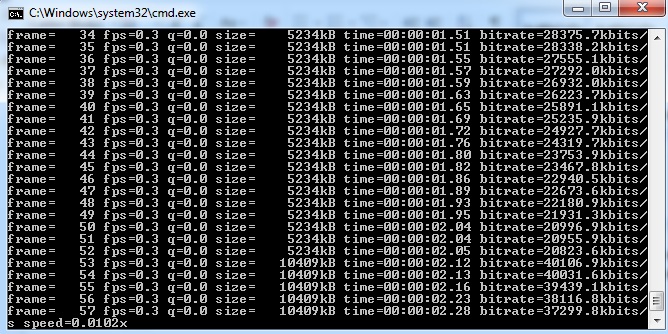
NOTE: You may have noticed I’m doing 2-pass here, which technically isn’t required for Constant Quality. I don’t know why, but for some reason using the libvpx codec with FFMPEG performs better in terms of quality AND file size when you do it. I know, it’s not meant to, but it does. Don’t ask, this part is already complicated enough. You can just do the first pass at a high-speed, it will create the temporary file and then the second pass is the important one so that’s at speed 0.
Agamemnus has a passion for gaming and an eye for tech. You can see him streaming occasionally on twitch.tv/unrealaussies and catch him on the Unreal Aussies Discord. Evidence > Opinion.